

Manage users
Every customer account on the platform is a user. This page covers creating accounts by hand, editing them, and the everyday support actions: impersonate, suspend, delete and two-factor reset.
Before you begin
Section titled “Before you begin”- You are signed in to the admin panel with an account that has user management permission. See Admin roles.
Where to find it
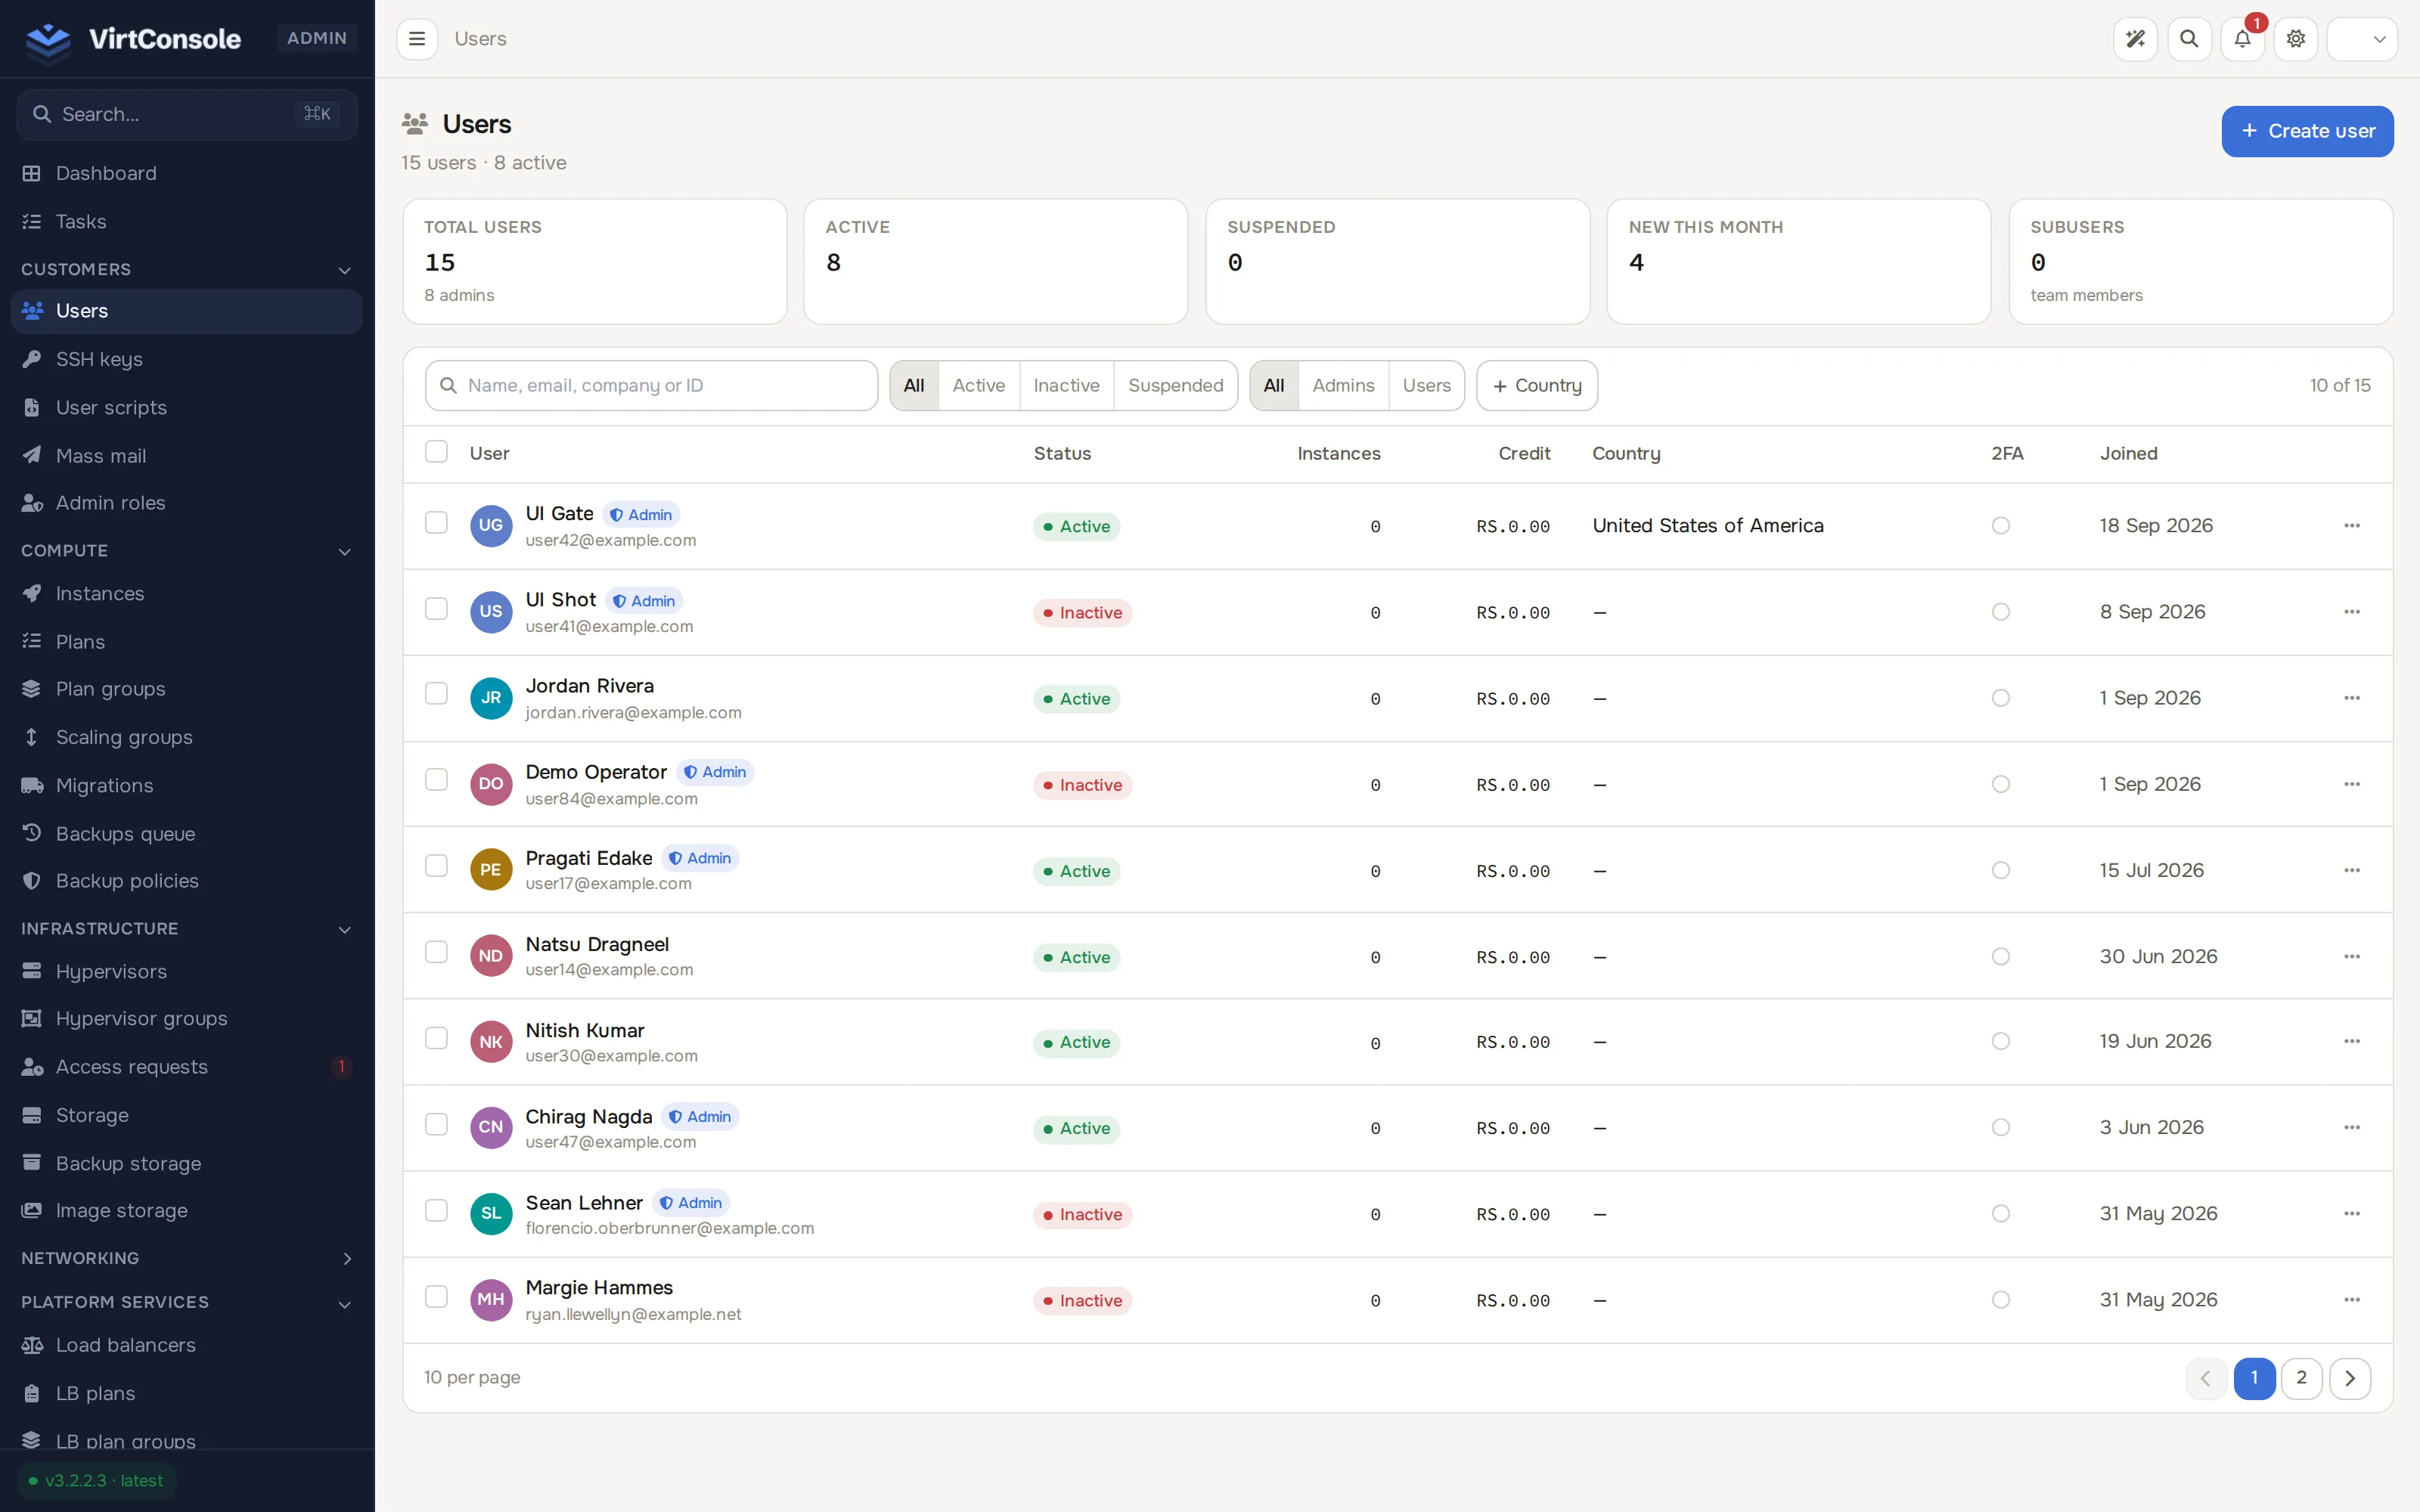
Section titled “Where to find it”In the admin panel go to Customers > Users. The header shows a stats strip: Total users, Active, Suspended, New this month and Subusers.
The list shows every account with User (name and email), Status, Instances, Credit, Country, 2FA and Joined. Filter by search text, a Status pill (Active / Inactive / Suspended), an Admins / Users pill, and an optional Country picker.
Create a user
Section titled “Create a user”-
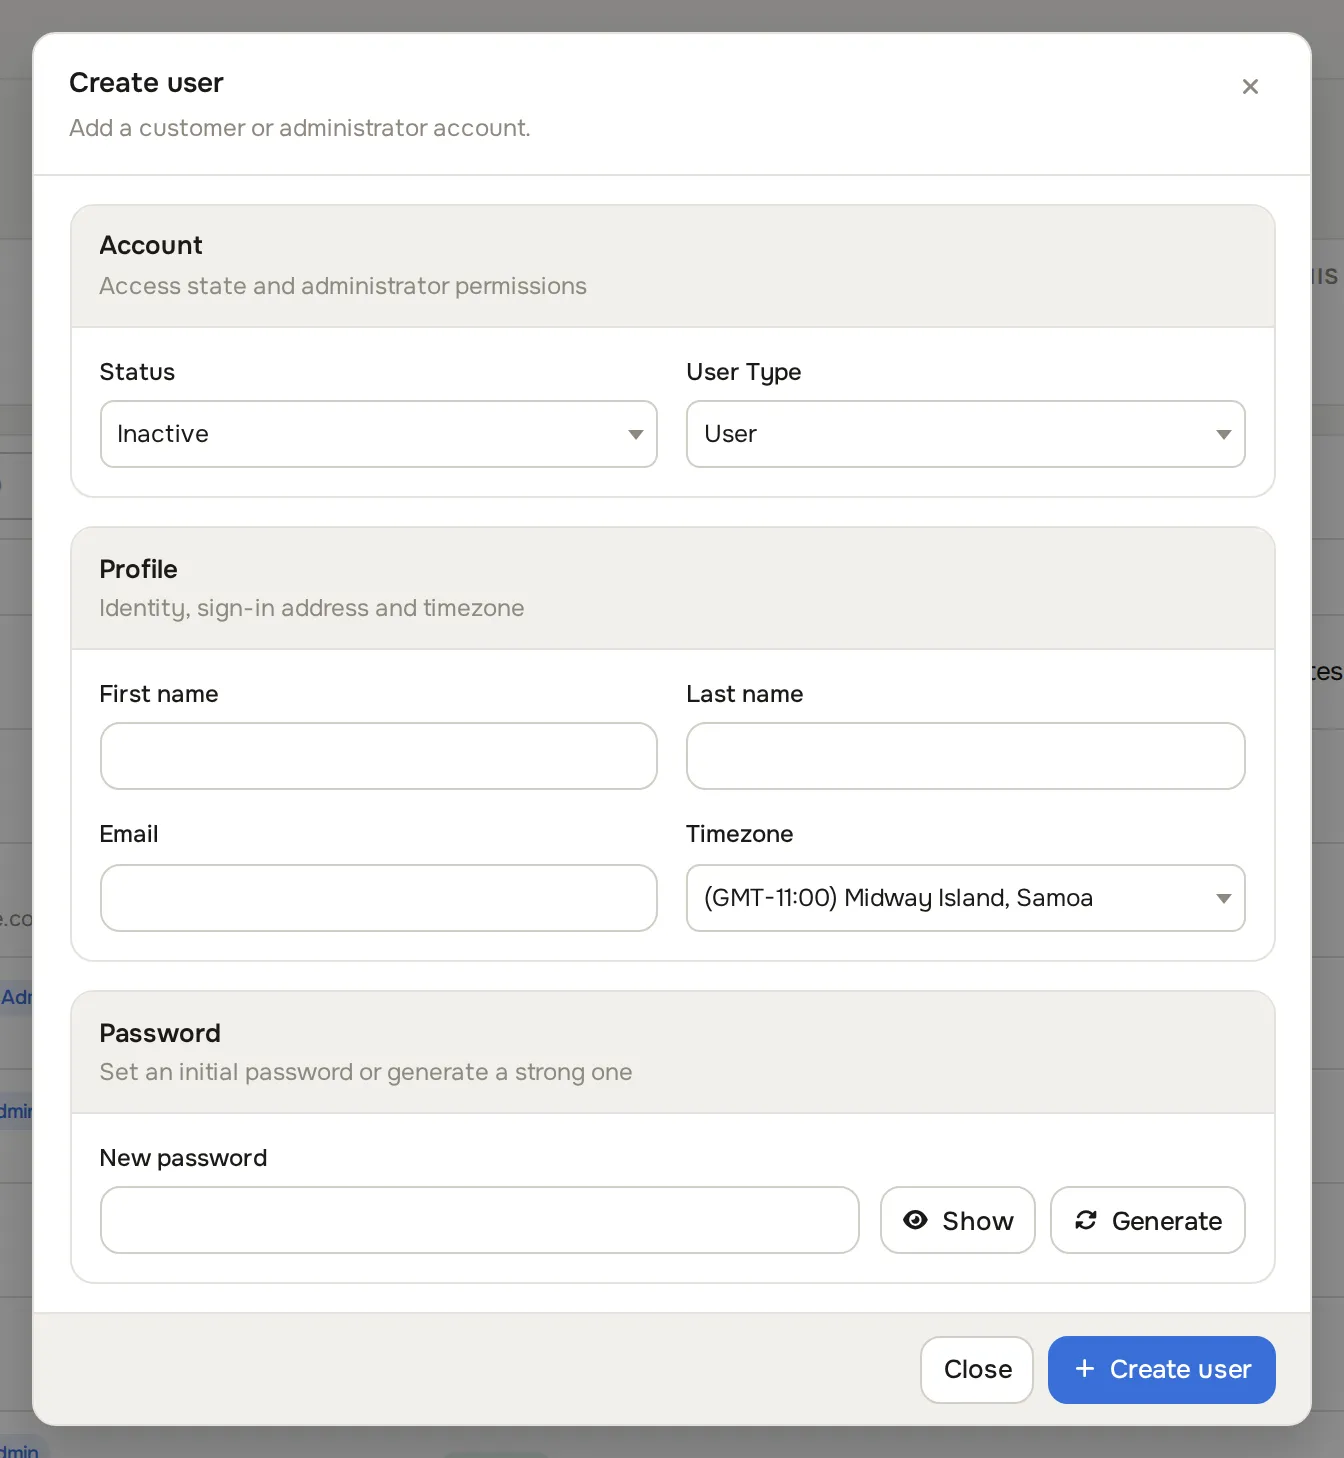
Click Create user. The Create user dialog opens.
-
Fill in the fields:
Fields
| Field | What to enter |
|---|---|
| Status | Active lets the user log in. Inactive and Suspended block login. |
| User Type | User for a customer. Administrator for a staff admin. |
| Admin Role | Shown only for administrators. Pick a role to scope their access, or leave empty for full access. See Admin roles. |
| First name / Last name | The customer’s name. |
| The login email. | |
| Timezone | Used for dates in the panel and in emails. |
| New password | Type one, or click the refresh icon to generate one. The eye icon reveals it. |
- Click Create User. The new user’s detail page opens.
The panel does not email the password automatically. Send it to the customer yourself.
Edit a user
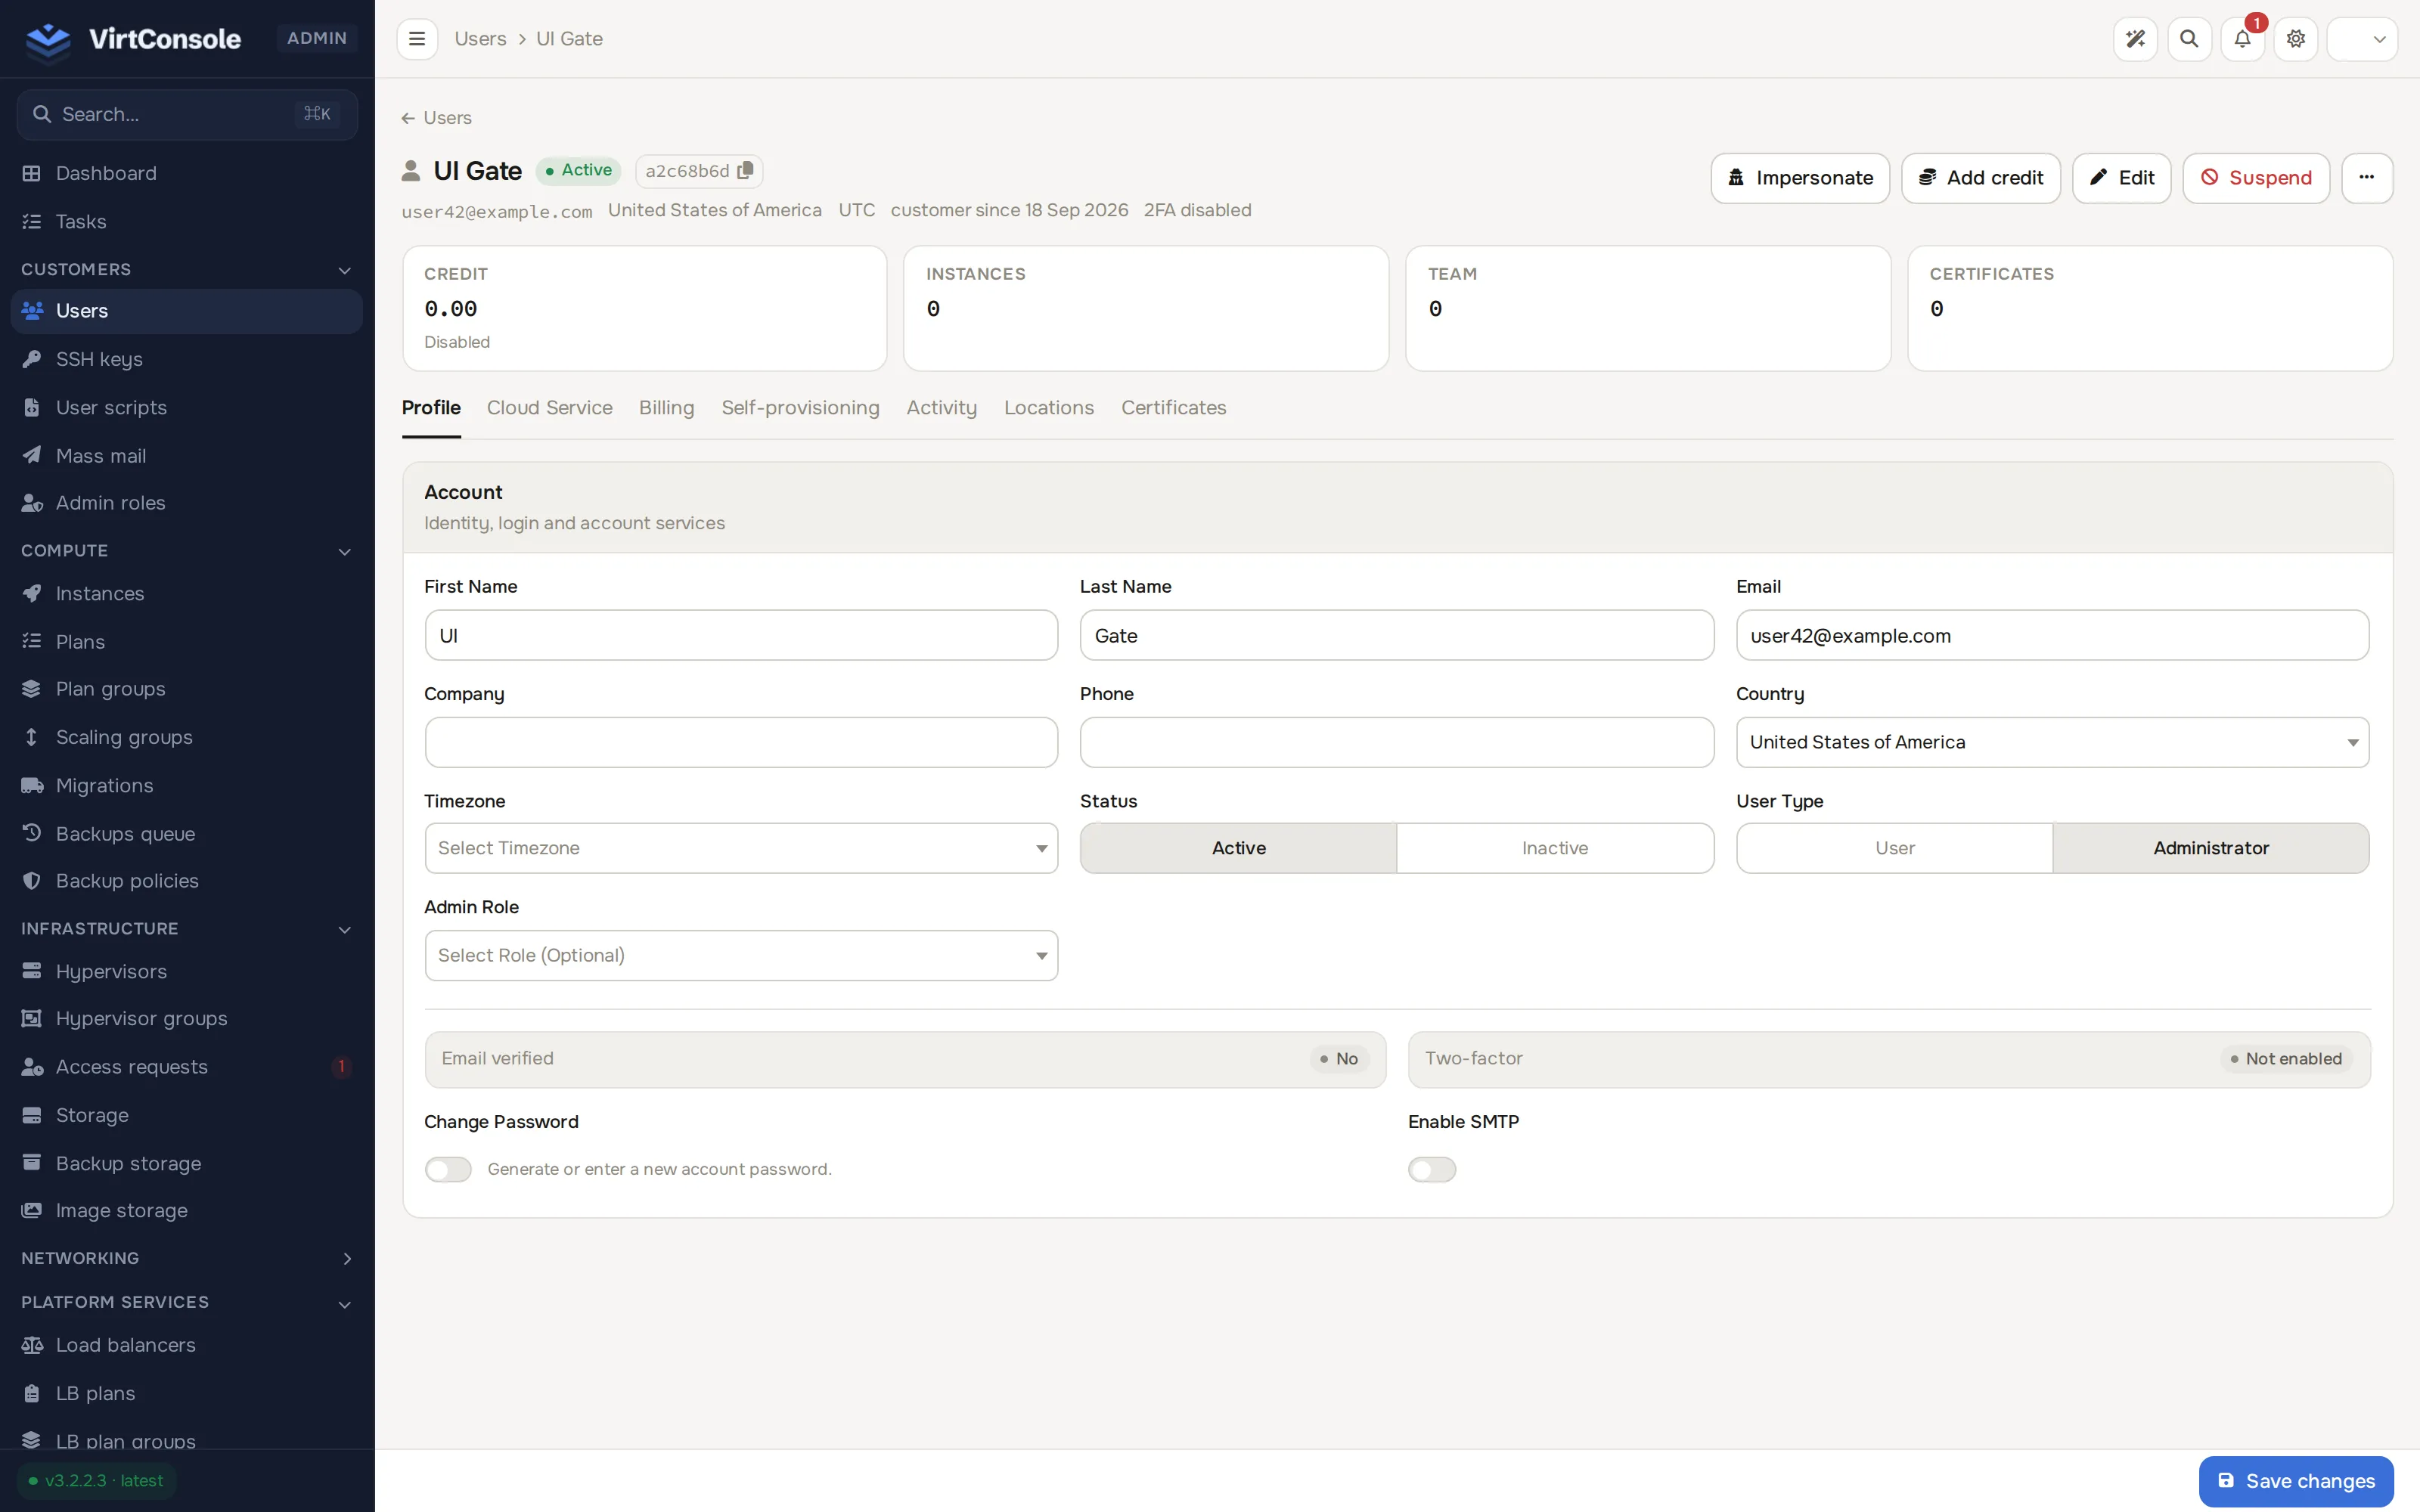
Section titled “Edit a user”Click a row to reach the user’s detail page. The header carries a status pill, a copyable user-id chip, a stats strip (Credit, Instances, Team, Certificates) and the action buttons Impersonate, Add credit, Edit, Suspend (or Resume), and a ⋯ overflow menu (Disable 2FA when enabled, Convert to Main Account for a subuser, Reset K8s rate limits, Delete user).
Below that sit the tabs: Profile, Cloud Service, Billing, Self-provisioning, Team (only when the account has team links), Activity, Locations and Certificates. Profile, Cloud Service, Self-provisioning and Billing save with the footer button (Save changes, or Save Tax Profile on the Billing tab); the others have no unsaved state to save.
Profile tab
Section titled “Profile tab”- Account: status (Active / Inactive seg — Suspended is set only via the header Suspend button), user type, admin role, name, email, company, phone, country, timezone. Toggle Change Password to set a new password. Toggle Enable SMTP to let this customer’s instances send outbound email; with it off, the panel blocks ports 25, 465 and 587 on their instances.
- Two read-only status chips show whether the email is verified and whether two-factor is enabled; use Disable 2FA in the header’s ⋯ menu to reset it when a customer loses their authenticator. They can then log in with password only and set 2FA up again.
Cloud Service tab
Section titled “Cloud Service tab”Controls what the customer can do with Cloud Service (the built-in pay-as-you-go billing), plus their KYC state:
- KYC: the submission’s status badge. If it is pending, Approve KYC and Reject buttons appear here.
- Billing Model (Disabled / Billed / Unbilled), Credit Purchase Allowed and Default Currency. The billing model decides whether the account can create cloud resources itself and whether they are charged; see Let an account use cloud features without billing.
- Resource Limits: per-resource caps (max vCPU cores, VPCs, NAT gateways, load balancers, VPN gateways, S3 buckets, managed databases, volumes, static IPs, images, certificates, DNS zones, serverless apps, Kubernetes clusters, Kubernetes nodes per cluster, Kubernetes snapshots per cluster).
0means unlimited. Certificates, DNS zones, Kubernetes clusters and Kubernetes nodes per cluster are enforced; the Kubernetes snapshots limit is stored but not enforced yet, since cluster snapshots have no create path in this release.
Use the header’s Add credit button to post a manual credit adjustment; it is not on this tab.
Billing tab
Section titled “Billing tab”The customer’s tax profile: entity type, display and business name, tax address, GSTIN / PAN / VATIN / US Tax ID. Save with Save Tax Profile in the footer.
Self-provisioning tab
Section titled “Self-provisioning tab”Toggle Enable Self Provisioning and pick Assigned Packs to let the customer deploy instances from resource packs. See Self-Provisioning packs.
Team tab
Section titled “Team tab”Shown only when the account has team links. See Team access.
Activity tab
Section titled “Activity tab”The audit log of actions on this account.
Locations tab
Section titled “Locations tab”Location Access Mode: All reaches every public location; Selected restricts the account to the locations you grant below. Granted Locations toggles access per location; a location with a pending request shows Approve and Deny buttons instead of a toggle.
Certificates tab
Section titled “Certificates tab”A read-only list of the customer’s TLS certificates: name, domains, type (Let’s Encrypt or uploaded), status, expiry, which load balancers use them, and fingerprint.
Impersonate a user
Section titled “Impersonate a user”Open the row’s ⋯ menu and click Impersonate, or click Impersonate in the header of their detail page. You land on their user panel dashboard, seeing exactly what they see.
Use impersonation when investigating a support ticket. Only customer accounts can be impersonated; the panel refuses to impersonate another administrator. To end the session, log out of the user panel.
Suspend or delete a user
Section titled “Suspend or delete a user”- Suspend: open the user and click Suspend in the header, then confirm. The customer can no longer log in. Their instances and data are untouched. Click Resume to restore access.
- Delete: open the row’s ⋯ menu and click Delete (or Delete user in the detail page’s own ⋯ menu), then confirm. The account is permanently removed —
Userdoes not soft-delete.
The row’s ⋯ menu also has Reset K8s rate limits (also in the detail page’s ⋯ menu). Use it when a customer hits the cluster create, scale or upgrade throttles.
Let an account use cloud features without billing
Section titled “Let an account use cloud features without billing”You can give an account the full self-service cloud (instances, VPCs, NAT gateways, VPN gateways, load balancers, managed databases, Kubernetes, volumes, static IPs and object storage) without switching on Cloud Service billing. Set the account’s Billing Model to Unbilled.
| Billing Model | What the account can do |
|---|---|
| Disabled | Cannot create cloud resources itself. This is the default for new accounts. |
| Unbilled | Creates cloud resources itself at no charge, whether or not Billing enabled is on. No credit balance is needed and none is checked. |
| Billed | Creates cloud resources itself, charged through Cloud Service, while Billing enabled is on. With billing off, a billed account cannot create them. |
To set it:
- Open the user and go to the Cloud Service tab.
- Choose Unbilled under Billing Model and save.
Team members always follow the account owner’s billing model, so set it once on the owner.
From the admin API, send cloud_provisioning with disabled, unbilled or billed when you create a user (POST /api/v1/users) or update one (PUT /api/v1/user/{userId}).
The billing model only decides who may create and whether it is charged. Each feature still has to be available where the customer creates it:
- The location (hypervisor group) has the feature switched on, for example VPC, NAT gateway, VPN gateway, load balancing, managed databases or block storage. See Hypervisor groups.
- VPCs, and Kubernetes clusters (which always run in a VPC), also need the location’s VPC network to be ready: an L2 interface set in the group’s VPC settings, or a Proxmox cluster group.
- Plans exist for the product: instance, managed database, load balancer, VPN gateway or volume plans.
- The account can see the location under its visibility or grant settings (the Locations tab).
- The account’s Resource Limits allow it.
There is no platform-wide switch that makes every account unbilled; the billing model is set per account.
What happens next
Section titled “What happens next”A customer created here can log in to the user panel immediately with the email and password you set. To give them something to log in for, deploy an instance for them from Compute > Instances. See Manage instances.
Common problems
Section titled “Common problems”- A staff admin logs in but every page is empty or missing. Their account has a role that grants no view permissions, or no role where one is required. Open their user page and check Admin Role on the Profile tab. See Admin roles.
- A customer cannot log in after you reset their 2FA. Disable 2FA only removes the second factor. If they also forgot their password, set a new one with Change Password on the Profile tab.
- Delete fails with an error about instances. The account still owns instances. Remove them first under Compute > Instances.
- A customer sees “Cloud Service billing is switched off on this platform”. Billing is off and the account’s Billing Model is not Unbilled. Set it to Unbilled, or switch billing on and use Billed. See Let an account use cloud features without billing.